Building a Node.js monorepo with Pnpm and Nx
Preface
In the previous chapter of this series of posts, we analyzed the reasons for using a monorepo to maintain many Node.js dependent packages, and the requirements to have a good development and continuous integration workflow. In this post we are going to see how to build a monorepo using Pnpm and Nx, that, used together, will cover all the described requirements.
We are going to create a repository containing two simple projects that theoretically would be published to NPM, and a project containing E2E tests of both packages integrated. This is a step-by-step tutorial, but if you want to have all the code available, all of the examples are in this Github repository.
Repository structure
In this tutorial, we will store the packages being published to NPM into a packages folder, and E2E tests into a test folder. The repository will contain also a package.json file in the root folder.
├── packages/
├── test/
├── .gitignore
└── package.json
The name of the folders is something that can be changed at your convenience. You could store your packages depending of their type in different folders, for example.
Nxrecommends as best practices to have anappfolder and alibsfolder for reusable libraries, but in my opinion that structure is more recommendable if you are going to include also front-end projects or other type of not versioned and distributable applications. In this case, all packages could be distributable and dependencies of other ones, that’s why the folder is namedpackages. I also like to keep integration or E2E tests in a different folder.
Installing Pnpm
As seen in the previous post, we are going to use Pnpm mainly to be able to link packages locally using its workspace feature.
First of all you have to install Pnpm globally in order to use it as Npm client and to run the package.json scripts that we will create in next steps. There are many methods for installing it, you can check them all in the Pnpm installation docs. Here we are going to use npm to install it:
npm install -g pnpm@next-7Now we can fill the package.json file with some basic info, and we can use Pnpm to install the dependencies.
{
  "private": true,
  "description": "Pnpm and Nx monorepo example",
  "scripts": {
    "prepare": "echo \"installed!\""
  }
}
pnpm iConfiguring Pnpm
Now that we have installed Pnpm, we have to configure it so it can know which is the root of the workspace, and where are the packages. Create a pnpm-workspace.yaml file in the root folder containing:
packages:
  # all packages in subdirs of packages/ and test/
  - 'packages/**'
  - 'test/**'
You can read Pnpm workspace docs for further info about how to include/exclude subfolders.
Creating a project
Let’s create our first project in the packages folder. We will name it sum-one. It will contain its own package.json file, and an index.js file exporting a method which sums one to a given number:
├── packages/
│   └── sum-one/
│       ├── index.js
│       └── package.json
├── test/
├── .gitignore
├── package.json
└── pnpm-workspace.yaml
For the moment, the packages/sum-one/package.json file only has to contain the basic package information:
{
  "name": "sum-one",
  "version": "1.0.0-alpha.1",
  "description": "Sums one to a given number"
}
And the packages/sum-one/index.js file exports a very simple method. We will import this package and use it from the other one afterwards in order to see how we can define dependencies between projects in the monorepo workspace.
function sumOne(number) {
  return number + 1;
}

module.exports = sumOne;
Project and workspace dependencies
Now we have two package.json files in the repository. The one in the root folder should contain shared devDependencies across many projects, such as test, build or lint libraries, etc. but note that the dependencies of each package (those required to work once they are published) must remain on their own package.json files. Otherwise, they will be missing when the packages are published.
Note that the dependencies of all packages in the repository are installed when pnpm i is executed in the root folder. And we can also use executables of the dependencies installed in the workspace from the npm scripts of the packages! 🥳
Project and workspace scripts
The scripts of each project can be executed independently from each package folder, and we can also define scripts for the workspace. So, let’s add one unit test to our recently created package in order to see an example.
We will install Jest in the workspace (as mentioned above, it is a devDependency, so we don’t have to install it on every single package):
pnpm add -wD jestThe
-wDin the example means “Install it in the workspace, as adevDependency”
Now we can use the jest executable in the packages/sum-one/package.json file, so let’s create one basic test in that package. Create a packages/sum-one/index.spec.js containing:
const sumOne = require("./index");

describe("sumOne", () => {
  it("should sum one to the given number", () => {
    expect(sumOne(2)).toEqual(3);
  });
});
And then add the script for running the test:
{
  "name": "sum-one",
  "version": "1.0.0-alpha.1",
  "description": "Sums one to a given number",
  "scripts": {
    "test:unit": "jest"
  }
}
Now, you can run the package unit tests script from the package folder:
cd packages/sum-one && pnpm test:unitBut we don’t want to be moving from one folder to another to run our development scripts, right? Be patient, in the next steps we will add workspace scripts to run any script from any package in the workspace from the root folder. 😉
Creating a dependent project
Now we are going to add another project in order to see how we can define dependencies between them, so we don’t have to publish one package to be able to use it from another one. For that, we will use the Pnpm Workspace feature, that allows to reference workspace packages through aliases. When packages are published, it automatically changes the references to the real versions or semver ranges, so we don’t have to care about that.
We will name sum-two to our new package, and it will depend on sum-one:
├── packages/
│   ├── sum-one/
│   │   ├── index.js
│   │   ├── index.spec.js
│   │   └── package.json
│   └── sum-two/
│       ├── index.js
│       ├── index.spec.js
│       └── package.json
├── test/
├── .gitignore
├── package.json
└── pnpm-workspace.yaml
Here is the content of the packages/sum-two/package.json file. Note the usage of workspace:* for creating a local reference from one package to another, that will be replaced by the real version of the other package (1.0.0-alpha.1) when this one is published.
{
  "name": "sum-two",
  "version": "1.0.0-beta.1",
  "description": "Sums two to a given number",
  "scripts": {
    "test:unit": "jest"
  },
  "dependencies": {
    "sum-one": "workspace:*"
  }
}
Now we can add the content of the packages/sum-two/index.js file, which will require the sum-one package:
const sumOne = require("sum-one");

function sumTwo(number) {
  return sumOne(sumOne(number));
}

module.exports = sumTwo;
And we are ready also to add the unit test of this package to the packages/sum-two/index.spec.js file:
const sumTwo = require("./index");

describe("sumTwo", () => {
  it("should sum two to the given number", () => {
    expect(sumTwo(3)).toEqual(5);
  });
});
Now we have to reinstall the workspace dependencies, and then we can run the unit tests of the sum-two package, which proves that our local reference works properly:
pnpm i
cd packages/sum-two && pnpm test:unit
Installing Nx
As a fast recap, at this point we have two dependent packages in the same repository, linked locally using the Pnpm Workspace feature. Both packages have unit tests and they share the jest dependency, but we can run them only from each different package folder.
Now we are going to install Nx because it provides the other requirements that we saw in the previous post:
- Dependencies analysis
- Detection of affected projects
- Tasks orchestration
Nx can also be installed globally, but I prefer to install it as a project dependency in order to define a specific version, so the same version is always used in all different local and remote environments. Afterwards we will expose some of the Nx commands that we need for our development workflow using our own package.json scripts.
Install as devDependencies the required nx packages and typescript, which is a peer dependency:
pnpm add -wD nx @nrwl/workspace typescriptConfiguring Nx
Nx has a lot of configuration options, but for the moment we are going to see only the basic configuration that allows to execute any package script from the root workspace folder, see the dependencies graph, etc. In next posts of this series we’ll see more advanced options.
Create a nx.json file in the root folder. It will contain some Nx basic configuration:
{
  "extends": "@nrwl/workspace/presets/npm.json",
  "affected": {
    "defaultBase": "main"
  },
  "npmScope": "@my-scope",
  "tasksRunnerOptions": {
    "default": {
      "runner": "@nrwl/workspace/tasks-runners/default"
    }
  },
  "implicitDependencies": {
    "pnpm-workspace.yaml": "*",
    "pnpm-lock.yaml": "*",
    "package.json": {
      "dependencies": "*",
      "devDependencies": "*"
    },
    "nx.json": "*"
  }
}
Using the Nx CLI
As we have not installed Nx globally, we need to define a script in our workspace package.json file to allow running its commands. For the moment we will only add a “shortcut” or “alias” to the nx command, but later we will add specific scripts for running usual development tasks. For simplicity of the examples, here we will show only the scripts property of the package.json file:
{
  "scripts": {
    "nx": "nx"
  }
}
Now we can use nx to run any script of any project in the workspace from the root folder. For example, we can run the unit tests of sum-one:
pnpm nx test:unit sum-oneNote that we use
pnpm nxto run anynxcommand through our workspacenxinstalled dependency instead of having it installed globally.nxsupports passing a npm script name as first argument and the package name as second argument:pnpm nx [script] [project]
So, for running the unit:test script of the sum-two package we can do:
pnpm nx test:unit sum-twoAdding workspace scripts
Now we are able to run any package script from the root folder of our workspace using Nx. But we can add more scripts for running usual tasks instead of using directly the nx interface. For example, let’s add one script for running all unit tests of all packages in the workspace. (As we will see later, in reality, this script shouldn’t be used very usual, because we should run only the unit tests of the affected packages, but it is added only to illustrate how to add custom scripts for making our workflow easier).
{
  "scripts": {
    "nx": "nx",
    "test:unit:all": "nx run-many --target=test:unit --all"
  }
}
Now, we can run the unit tests of every package in our workspace with a single command, and it will be done in parallel! 🥳
pnpm test:unit:allYou can learn more about the
nxinterface in its API reference page. It provides lots of options for filtering projects, enabling/disabling parallel executions, etc.
Dependencies graph
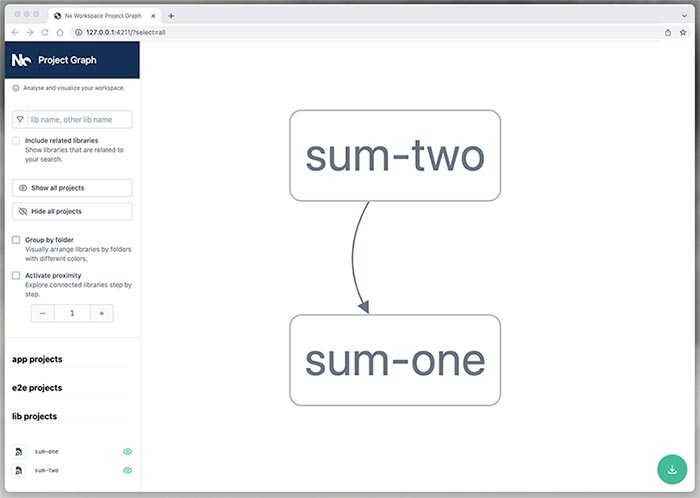
An awesome feature of Nx is the ability of starting a web app drawing a graph with the dependencies between the projects in our workspace. Simply run:
pnpm nx graphThis will open automatically a browser tab with the Nx dependencies graph:
Affected projects
In a previous step, we added a script to run all unit tests of all packages in the workspace just to show how to add useful alias scripts to our workspace. But this is something that we normally wouldn’t want to do. We usually want to run just the unit tests of the packages that have been modified, and also the unit tests of the packages that are dependent on them, and the affected integration or E2E tests.
Here is where the Nx affected command enters. Using it, we can compare our repository branch with the desired base branch in order to know which projects have been modified, and then calculate the affected ones, and run any script from all of them.
Let’s add one script to the root package.json file in order to provide an easy alias for doing it:
{
  "scripts": {
    "nx": "nx",
    "test:unit:all": "nx run-many --target=test:unit --all",
    "test:unit:affected": "nx affected --target=test:unit"
  }
}
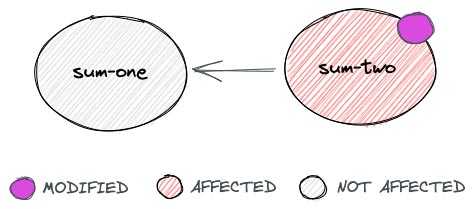
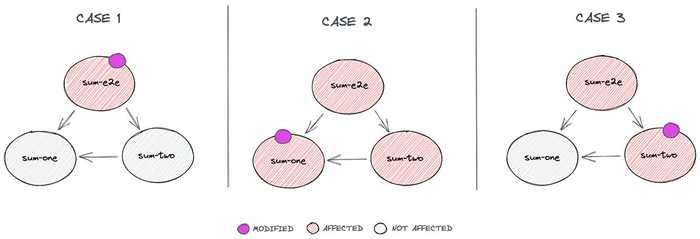
Note that this script has to be executed in a Git repository to be able to compare changes. The default base branch to compare with is defined in the nx.json file that we created previously, which in this case is main. So, supposing that you have a repository and you have all previous changes promoted to the main branch, if you modify the packages/sum-two/index.js file, running the next command would execute only the unit tests of the sum-two package, because no other package depends on it.
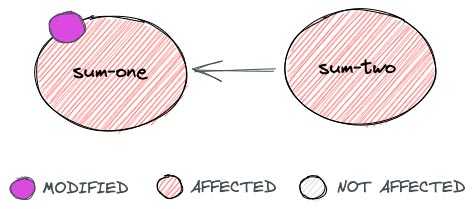
pnpm test:unit:affectedBut, if you create another branch and modify the packages/sum-one/index.js file, running pnpm test:unit:affected would execute the unit tests of both packages, because modifying sum-one also affects to sum-two.
Dependent tasks
Now we can run the unit tests of the affected packages with a single command, but, what about if the unit:test script in any package needs any other script to be executed before? For example, suppose that the sum-two package has a build script that must be executed before running the unit tests. Should we execute it manually before running the affected command? If we have twenty packages in the workspace, some of them containing a build command, and some others not, then should we create a build:affected script and execute it always before running the unit tests? Well, we could, but Nx provides a mechanism to define dependent tasks, so it detects whether any package have dependent tasks that should be executed before others, and it executes them in that case.
Nx also provides a cache mechanism, so it won’t execute a dependent task of a package that has not been modified since it was executed the last time, so you don’t have to care about the performance of running every dependent tasks always. You can read about how to configure it in the Nx docs.
So, let’s add a fake build script to the packages/sum-two/package.json file:
{
  "scripts": {
    "build": "echo \"Built!\"",
    "test:unit": "jest"
  }
}
You can check that the new script works properly by running:
pnpm nx build sum-twoIf the command above does not work, try cleaning the
nxcache runningpnpm nx reset. Sometimes Nx needs a “little push” when adding scripts or modifying configurations.
Now that we have a build command that theoretically should be executed before running the unit tests, let’s let Nx know about that dependency. We must edit the nx.json file, adding the targetDependencies property as in the next example:
{
  "targetDependencies": {
    "build": [
      {
        "target": "build",
        "projects": "dependencies"
      }
    ],
    "test:unit": [
      {
        "target": "build",
        "projects": "self"
      }
    ]
  }
}
With this configuration, we are saying to Nx: “Before running the test:unit script of any package, run the build script of the package itself, and before running the build script of any package, run the build script of its dependencies.”. So, in our case, when we run:
pnpm nx test:unit sum-twoIt will run first the build script of the sum-two package, and then the test:unit one. If there was a build script in the sum-one package, it would execute it as well, because it is a dependency of the sum-two one.
Adding integration or E2E tests
In order to have a full example before going to the next chapter, in which we will create a continuous integration pipeline using a Github action, we are going to add also a project containing E2E tests. In our case, the unit tests of the sum-two package should be enough, because unit tests are not mocking the dependency with sum-one. But note that the code of the projects here is not really relevant.
├── packages/
│   ├── sum-one/
│   │   ├── index.js
│   │   ├── index.spec.js
│   │   └── package.json
│   └── sum-two/
│       ├── index.js
│       ├── index.spec.js
│       └── package.json
├── test/
│   └── sum-e2e/
│       ├── index.spec.js
│       └── package.json
├── nx.json
├── package.json
└── pnpm-workspace.yaml
Here is the code of the test/workspace-e2e/package.json file. We will use the sum-two and sum-one packages to execute the test, so we define the dependencies, and note that we have also added a script named test:e2e. This is useful to differentiate the type of test that we want to execute, so we can run affected E2E tests and unit tests in a different stage of the pipeline, for example.
{
  "name": "sum-e2e",
  "private": "true",
  "description": "E2E tests of all sum packages",
  "scripts": {
    "test:e2e": "jest"
  },
  "dependencies": {
    "sum-one": "workspace:*",
    "sum-two": "workspace:*"
  }
}
Let’s write the code of the test. We are going to use also the sum-one package just to add another dependency. It may have no sense in a real project, but it is useful for this example:
const sumTwo = require("sum-two");
const sumOne = require("sum-one");

describe("When using sumOne and sumTwo", () => {
  it("should sum three to the given number", () => {
    expect(sumOne(sumTwo(4))).toEqual(7);
  });
});
Let’s add also a new task dependency, so before running E2E tests it will also run the build script of all dependent projects. Modify the targetDependencies property in the nx.json file as in:
{
  "targetDependencies": {
    "build": [
      {
        "target": "build",
        "projects": "dependencies"
      }
    ],
    "test:unit": [
      {
        "target": "build",
        "projects": "self"
      }
    ],
    "test:e2e": [
      {
        "target": "build",
        "projects": "dependencies"
      }
    ]
  }
}
Now, we are ready to install the dependencies of the new project, reset the nx cache (this is recommended when adding a new project) and run the E2E tests:
pnpm i
pnpm nx reset
pnpm nx test:e2e sum-e2e
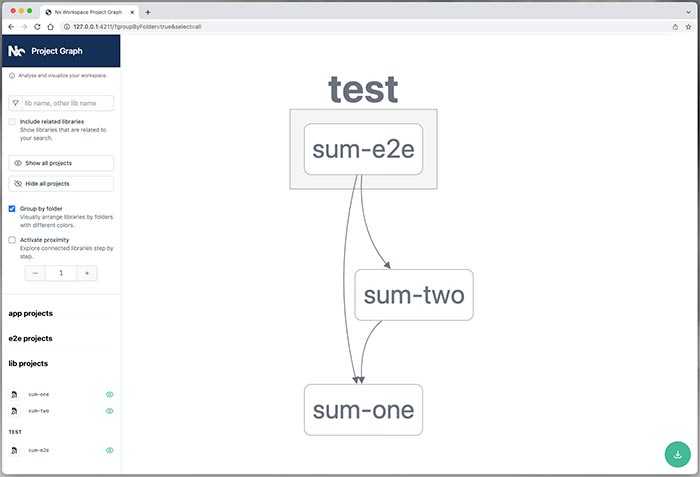
We can also run the Nx graph command to see how our dependencies graph has changed after adding this new project:
pnpm nx graphYou may have noticed that Nx does not recognize the
sum-e2eproject as ofe2etype. For allowing Nx to recognize it, we should add aproject.jsonfile to the project defining its type as “application”, but this produces Nx not detecting the dependencies automatically in our simple example if we don’t add more configuration such as TypeScript aliases. So, I have omitted that extra configuration in order to keep the examples of this post as simple as possible.
Incremental testing
Based on the previous dependencies graph, and in the mentioned “affected” Nx feature, note this: If we execute pnpm nx affected --target=test:e2e, our E2E tests project would be always executed because it is always affected by any modification, but the unit tests of each project (pnpm nx affected --target=test:unit) would be executed only when it has sense depending on the modification made.
NOTE: If you are using a Pnpm version lower than 7.0, you should add an extra
--to the Pnpm commands before the Nx arguments:pnpm nx affected -- --target=test:unit
Conclusion
In this post we have seen how to create a monorepo using Pnpm and Nx. Let’s see the list of requirements that we set in in the previous chapter of this series of posts in order to check whether it meets all of them or not:
- Configuration for linking dependencies locally - ✅ It host many packages linked locally. The local references between packages are changed automatically to pinned versions when they are published.
- Dependencies analysis - ✅ It is able to detect dependencies between projects, and even provides a graph.
- Detecting affected packages/projects - ✅ It determines which projects might be affected by a change.
- Task orchestration - ✅ It is able to run dependent tasks in the correct order with some minimal configuration.
Effectively, our monorepo meets all of the requirements that we defined in the previous chapter, with minimal configuration. The configuration could be improved in order to let Nx know the type of each project for adding more features like architecture boundaries using eslint, etc., but this, among other lot of things that obviously can be improved, is out of the scope of this post.
In the next chapter, we will use this example to create a continuous integration workflow for the monorepo using a Github action.
Note: The examples of this post are available at this Github repository.

